Showing posts with label FuelPHP. Show all posts

Wednesday, October 3, 2018

Getting Started With Eclipse Che, OpenShift, FuelPHP


.

Getting Started With Eclipse Che, OpenShift, FuelPHP

Eclipse Che is a developer workspace server and cloud IDE. You install, run, and manage Eclipse Che with with different container orchestration engine such as Docker or OpenShift.
Eclipse Che is available in two different modes:
  • Single-user: perfectly suited for personal desktop environment.
  • Multi-user: best for organization and developer teams.
If you want to learn more about the differences between single-user and multi-user, please read this page

OpenShift

Che supports different flavors of OpenShift:
If you want to try Che on OpenShift, we recommend you to do it with MiniShift and use the MiniShift add-on for Che.

1) Goto Che Website

If you haven’t got any acount, click the “Create a free account” button.

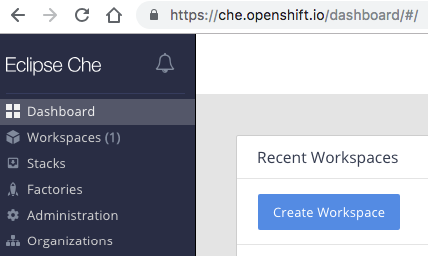
2) Go to Che Dashboard

If you have already got an OpenShift account, you will be redirected to https://che.openshift.io/dashboard 
.

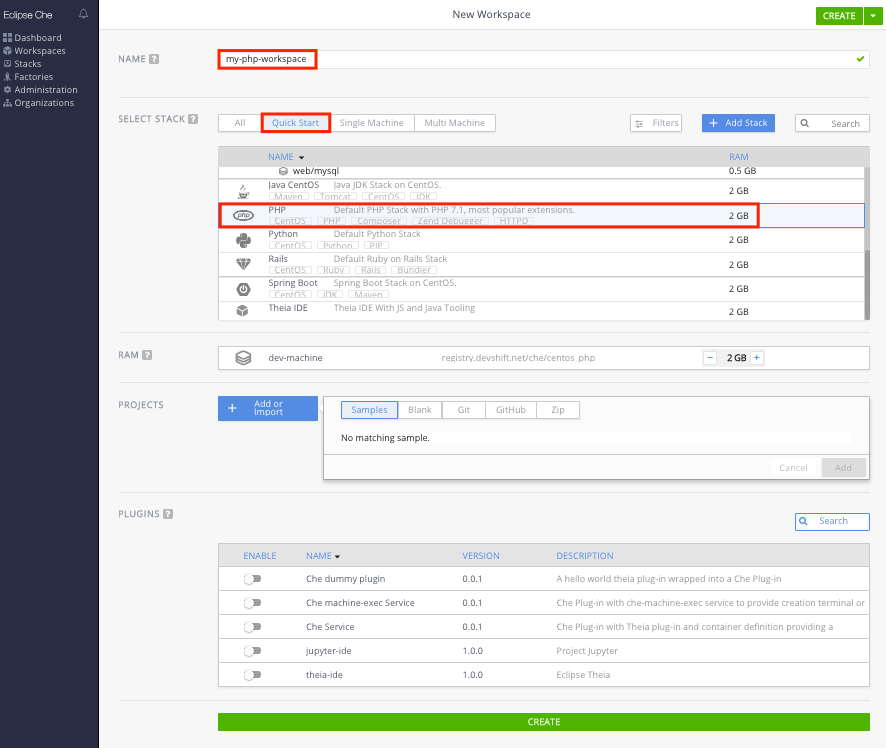
3) Create A New Workspace

Enter workspace details.
E.g.
Name = my-php-workspace
Stack = PHP
Project = (none)
Plugins = (none)
Click Create button.

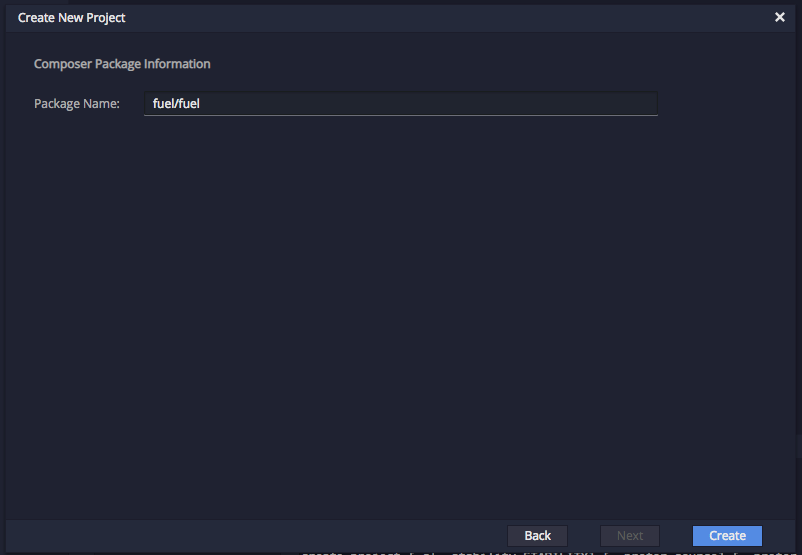
4) Create New Project

Since we did not specify any project in the previous step, we are required to do so now.

4.1) Select PHP Composer option.

4.2) Specify FuelPHP package

Package name= fuel/fuel

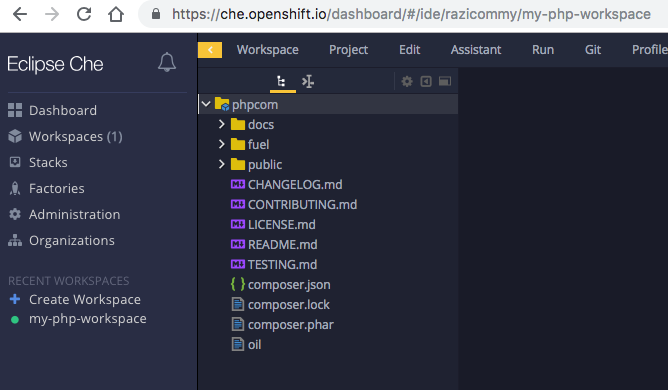
4.3) Wait until the process is completed.

It will take some time for the system to generate FuelPHP project based on composer package name.

5) Run Project

5.1) Run Apache

Find the run button.
Click and select Start Apache.

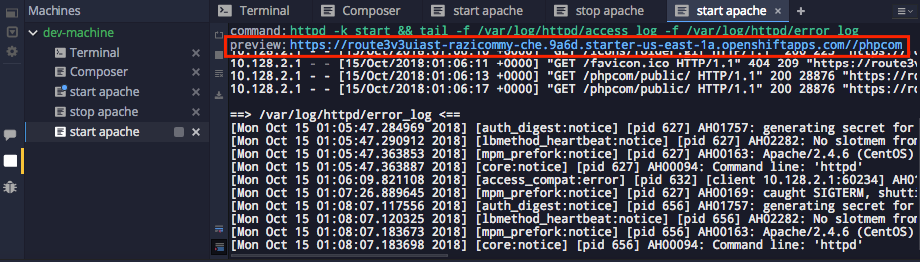
5.2) Browse the view URL

Find the view url in the console under the start apache tab.

6) Debug

The page may be having a problem when it is viewed in the browser e.g. mixed content request.
In the above example, the css content was requested via insecure connection.
We can enforce the FuelPHP to use a base url .
Edit ./fuel/app/config/config.php
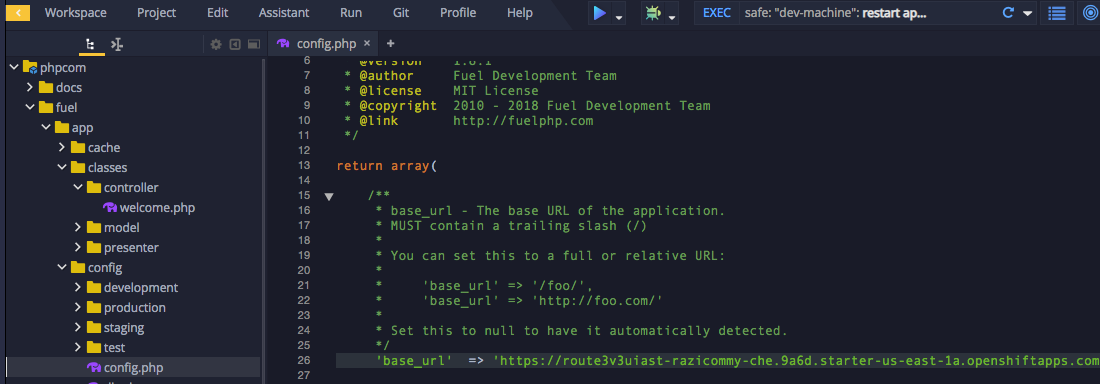
'base_url'  => 'https://route3v3uiast-razicommy-che.9a6d.starter-us-east-1a.openshiftapps.com/phpcom/public/',
Mixed content error is solved now.
.

Monday, October 1, 2018

Install FuelPHP via Softaculous


You can have the FuelPHP framework installed in minutes by using the Softaculous application installer in cPanel.

To install FuelPHP using Softaculous, follow these steps:

1) Log in to cPanel.


In the SOFTACULOUS APPS INSTALLER section of the cPanel home screen, click any of the options under Categories. The Softaculous installer page appears.

It does not matter which option you click under Categories. All of them start the Softaculous installer.

In the Search text box, type fuelphp and then press ENTER.

Alternatively, you can use the navigation pane on the left side.  To do this, click Frameworks, and then click FuelPHP.

Click Install. The installation page appears.

2) In the Choose Protocol list box, select the protocol.


If you have an SSL certificate installed on your site, select https:// or https://www. If you do not have an SSL certificate installed on your site, select http:// or http://www.

3) In the Choose Domain list box, select the domain for installation, or accept the default value.


4) In the In Directory text box, type the directory where you want to install the application, or accept the default value.


If you want your domain name to go directly to the application, make sure the In Directory text box is blank.

5) Click the Advanced Options icon icon to expand Advanced Options.


If you do not want to receive e-mail notifications when application updates are available, select the Disable Update Notifications check box.

It is recommended that you receive e-mail notifications when application updates are available. Keeping your site updated helps prevent unauthorized access attempts and data loss.

6) To receive site configuration information after the installation is complete, type an e-mail address in the Email installation details to text box.


7) Review the installation options and settings, and then click Install. When installation is complete, Softaculous provides information about the application's configuration.


Sunday, May 13, 2018

Verify Firebase ID Token Using Fuel PHP


This is a simplistic approach to use a PHP Framework (Fuel PHP) instead of Plain PHP.

Frameworks often have better mechanisms to handle web requests. For example, you can easily create a RESTful server and test it using REST Client such as Postman (refer the above screenshot). Install Postman REST Client for Chrome here.

1) Create Fuel PHP Project and Add PHP-JWT Library to the project


If your hosting provider includes softaculous in their services, read this page to quickly create Fuel PHP Project on your web site, https://php-steps.blogspot.com/2018/10/install-fuelphp-via-softaculous.html .

2) Write the PHP script


filename: ./fuel/app/classes/controller/verifytoken.php


If you do not want to use PHP Framework, read this page to create Plain PHP script codes, https://php-steps.blogspot.com/2018/05/verify-firebase-id-token-using-plain.html .

Labels

apt-get (2) bash (4) Chrome (1) CMS (1) code-igniter (1) codenvy (1) composer (6) eclipse che (1) error (4) file-permission (1) firebase (2) Free PHP Hosting (11) FuelPHP (3) git (4) jwt (1) laravel (10) mysql (1) OpenShift (1) php (11) PHP Eclipse (9) PHP Joomla (2) PHP Laravel (4) PHP Yii (9) PHP-JBOSS (2) php-jwt (2) PHP-Wordpress (8) plain php (1) Postman (1) REST (2) sqlite (1) sudo (1) visual-studio (4) xampp (4)