.
PROBLEM:
RuntimeException
No application encryption key has been specified.
SOLUTION:
1. If .env does not exist in root folder, .env.example file in the root of your project to .env or create a new .env file.
2. You should not just create empty .env file, but fill it with content of .env.example.
.envfile look like this: (Fill up with required database connection)
APP_ENV=local
APP_DEBUG=true
APP_KEY=SomeRandomString
APP_URL=http://localhost
DB_HOST=127.0.0.1
DB_PORT=3306
DB_DATABASE=homestead
DB_USERNAME=homestead
DB_PASSWORD=secret
CACHE_DRIVER=file
SESSION_DRIVER=file
QUEUE_DRIVER=sync
REDIS_HOST=127.0.0.1
REDIS_PASSWORD=null
REDIS_PORT=6379
MAIL_DRIVER=smtp
MAIL_HOST=mailtrap.io
MAIL_PORT=2525
MAIL_USERNAME=null
MAIL_PASSWORD=null
MAIL_ENCRYPTION=null
.
3. In the terminal go to the project root directory(not public folder) and run
php artisan key:generate
If everything is okay, response in terminal should look like this
Application key [base64:wbvPP9pBOwifnwu84BeKAVzmwM4TLvcVFowLcPAi6nA=] set successfully.
4. Check that the Application Key is inserted into .env file.
You can just copy key itself and paste it in your .env file as the value to APP_KEY. Result line should looks like this:
APP_KEY=base64:wbvPP9pBOwifnwu84BeKAVzmwM4TLvcVFowLcPAi6nA=
5. In terminal run
php artisan config:cache
.
REFERENCE:
https://stackoverflow.com/questions/44839648/no-application-encryption-key-has-been-specified-new-laravel-app

Wednesday, October 17, 2018
Solution To: Laravel Error file_get_contents(/var/www/laravel/.env): failed to open stream
.
PROBLEM:
file_get_contents(/var/www/laravel/.env)
: failed to open stream
: No such file or directory”?
SOLUTION:
Probably you missed your .env file in laravel project folder.So make .env.example to .env file. Also give the required database connection.
.envfile look like this: (Fill up with required database connection)
APP_ENV=local
APP_DEBUG=true
APP_KEY=SomeRandomString
APP_URL=http://localhost
DB_HOST=127.0.0.1
DB_PORT=3306
DB_DATABASE=homestead
DB_USERNAME=homestead
DB_PASSWORD=secret
CACHE_DRIVER=file
SESSION_DRIVER=file
QUEUE_DRIVER=sync
REDIS_HOST=127.0.0.1
REDIS_PASSWORD=null
REDIS_PORT=6379
MAIL_DRIVER=smtp
MAIL_HOST=mailtrap.io
MAIL_PORT=2525
MAIL_USERNAME=null
MAIL_PASSWORD=null
MAIL_ENCRYPTION=null
.
REFERENCE:
https://stackoverflow.com/questions/36761778/how-to-resolve-the-error-errorexception-file-get-contents-var-www-laravel-e
Solution To: Laravel Error failed to open stream: Permission denied
PROBLEM:
Laravel Error failed to open stream: Permission denied
SOLUTION:
Most folders should be normal "755" and files, "644"
Laravel requires some folders to be writable for the web server user. You can use these command on *nix based OSs.
Using ACL
// nginx = web server user
// systemuser = your local user which you use to login via ssh
sudo setfacl -Rdm u:nginx:rwx,u:systemuser:rwx storage
sudo setfacl -Rm u:nginx:rwx,u:systemuser:rwx storage
Alternatively, if you don't have ACL
sudo chgrp -R www-data storage bootstrap/cache
sudo chmod -R ug+rwx storage bootstrap/cache
REFERENCE:
https://laracasts.com/discuss/channels/general-discussion/laravel-framework-file-permission-security
https://stackoverflow.com/questions/30639174/file-permissions-for-laravel-5-and-others
Solution To: Whoops, looks like something went wrong. Laravel 5.0
.
PROBLEM:
I installed Laravel 5.0 properly by cloning in git, and composer install, when I ran it to browser http://localhost/laravel/public/, it says
"Whoops, looks like something went wrong."
SOLUTION:
The error logs are located in storage directory.
You need to check the error message in order to identify the cause of the error.
Solution To: Laravel 5 Failed opening required bootstrap/../vendor/autoload.php
PROBLEM:
Laravel 5 Failed opening required bootstrap/../vendor/autoload.php
SOLUTION:
...
When the new project created the laravel require to load vendors to autoload the libraries , We need to tell composer to update via command:
composer update
Composer is a dependency manager allows you to delegate responsibility for managing your dependencies to a third party.
In some cases, you need to tell composer to install first via ommand:
composer install
If this does not solve the problem, make sure the following php modules are installed php-mbstring php-dom
To install this extensions run the following in terminal
sudo apt-get install php-mbstring php-dom
once the installation is complete
try running the command in your project root folder
composer install
REFERENCE:
https://stackoverflow.com/questions/28468625/laravel-5-failed-opening-required-bootstrap-vendor-autoload-php
Solution To: CodeEnvy Laravel 5.6 which requires PHP 7.1.3 or higher, but the recipe installs PHP 7.0.
PROBLEM:
When you use the eclipse/php:laravel recipe, it installs Laravel 5.6 which requires PHP 7.1.3 or higher, but the recipe installs PHP 7.0.
SOLUTION:
The temporary solution is to manually install PHP 7.2:
sudo apt-get update
sudo apt-get install python-software-properties
sudo add-apt-repository ppa:ondrej/php
sudo apt-get update
sudo apt-get purge php7.0 php7.0-common
sudo apt-get install php7.2-curl php7.2-xml php7.2-zip php7.2-gd php7.2-mysql php7.2-mbstring
REFERENCE:
https://github.com/codenvy/codenvy/issues/2673
Wednesday, October 3, 2018
Getting Started With Eclipse Che, OpenShift, FuelPHP
.
Getting Started With Eclipse Che, OpenShift, FuelPHP
Eclipse Che is a developer workspace server and cloud IDE. You install, run, and manage Eclipse Che with with different container orchestration engine such as Docker or OpenShift.
Eclipse Che is available in two different modes:
- Single-user: perfectly suited for personal desktop environment.
- Multi-user: best for organization and developer teams.
If you want to learn more about the differences between single-user and multi-user, please read this page
OpenShift
Che supports different flavors of OpenShift:
- OpenShift Container Platform (OCP): OpenShift on-premise, that you can install in your Data Center.
- OpenShift Online (OSO): On-Demand OpenShift hosted on public cloud and managed by Red Hat.
- OpenShift Dedicated (OSD): Enterprise public cloud with your own OpenShift cluster managed by Red Hat.
- MiniShift: OpenShift running on your local environment.
If you want to try Che on OpenShift, we recommend you to do it with MiniShift and use the MiniShift add-on for Che.
1) Goto Che Website

If you haven’t got any acount, click the “Create a free account” button.
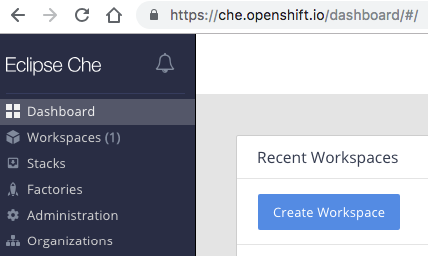
2) Go to Che Dashboard
If you have already got an OpenShift account, you will be redirected to https://che.openshift.io/dashboard
.

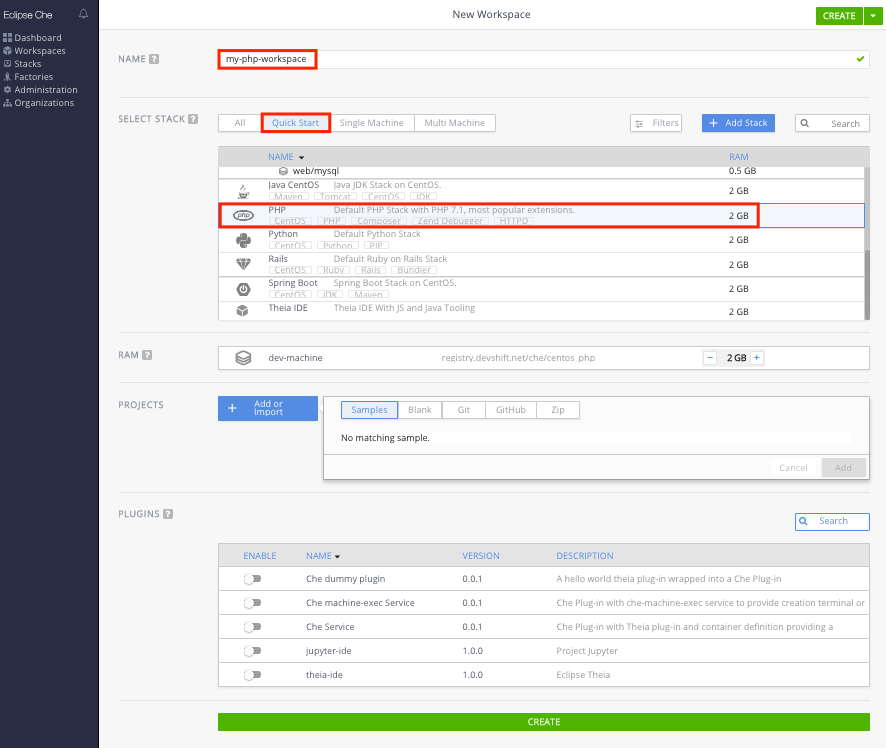
3) Create A New Workspace
Enter workspace details.
E.g.
Name = my-php-workspace
Stack = PHP
Project = (none)
Plugins = (none)
Click Create button.

4) Create New Project
Since we did not specify any project in the previous step, we are required to do so now.

4.1) Select PHP Composer option.

4.2) Specify FuelPHP package
Package name= fuel/fuel
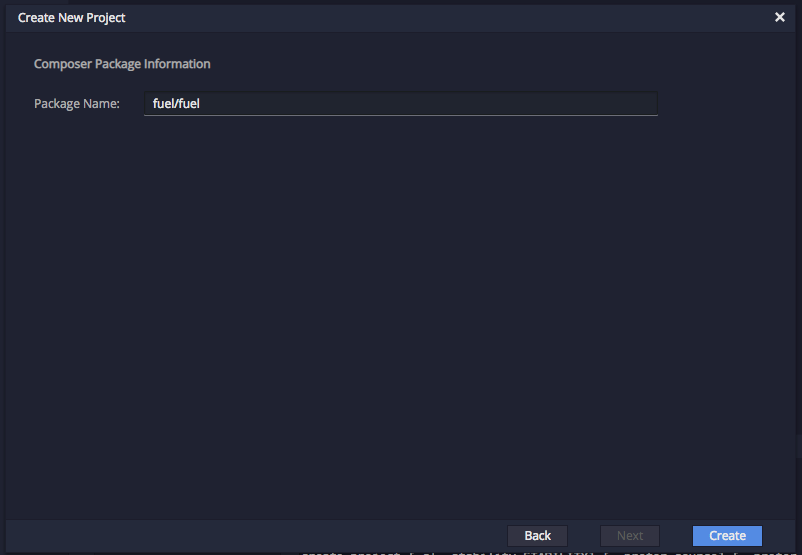
4.3) Wait until the process is completed.
It will take some time for the system to generate FuelPHP project based on composer package name.
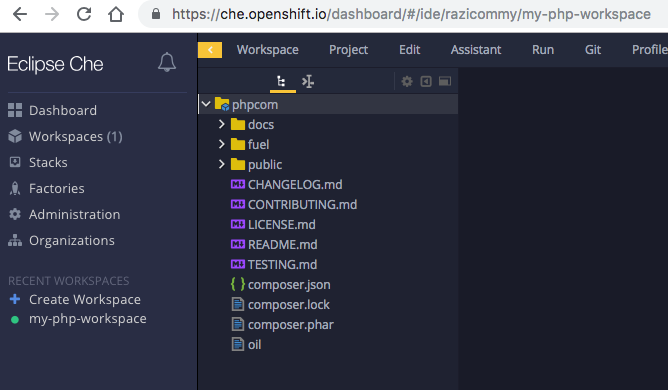
5) Run Project
5.1) Run Apache
Find the run button.
Click and select Start Apache.

5.2) Browse the view URL
Find the view url in the console under the start apache tab.
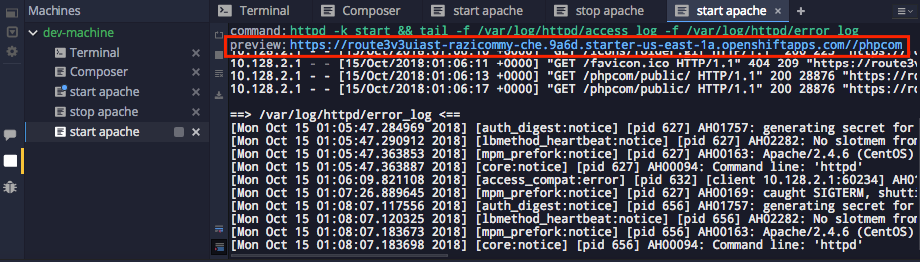
6) Debug
The page may be having a problem when it is viewed in the browser e.g. mixed content request.

In the above example, the css content was requested via insecure connection.
We can enforce the FuelPHP to use a base url .
Edit ./fuel/app/config/config.php
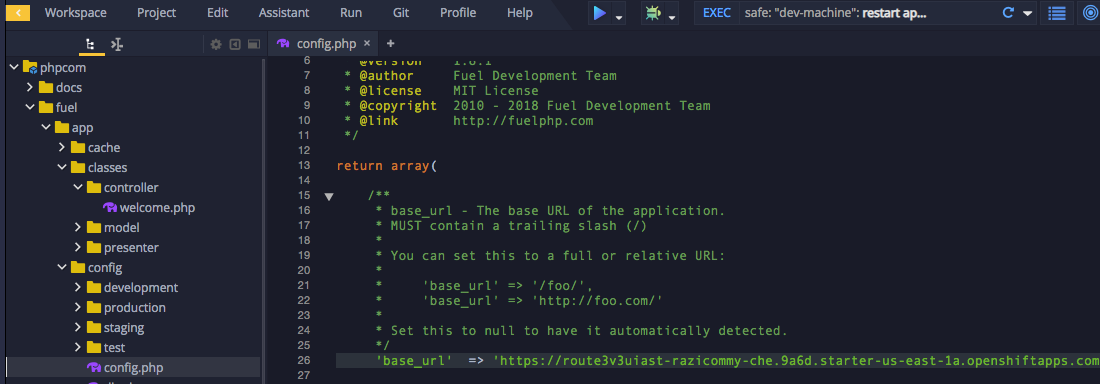
'base_url' => 'https://route3v3uiast-razicommy-che.9a6d.starter-us-east-1a.openshiftapps.com/phpcom/public/',
Mixed content error is solved now.

Tuesday, October 2, 2018
Monday, October 1, 2018
Install FuelPHP via Softaculous
You can have the FuelPHP framework installed in minutes by using the Softaculous application installer in cPanel.
To install FuelPHP using Softaculous, follow these steps:
1) Log in to cPanel.
In the SOFTACULOUS APPS INSTALLER section of the cPanel home screen, click any of the options under Categories. The Softaculous installer page appears.
It does not matter which option you click under Categories. All of them start the Softaculous installer.
In the Search text box, type fuelphp and then press ENTER.
Alternatively, you can use the navigation pane on the left side. To do this, click Frameworks, and then click FuelPHP.
Click Install. The installation page appears.
2) In the Choose Protocol list box, select the protocol.
If you have an SSL certificate installed on your site, select https:// or https://www. If you do not have an SSL certificate installed on your site, select http:// or http://www.
3) In the Choose Domain list box, select the domain for installation, or accept the default value.
4) In the In Directory text box, type the directory where you want to install the application, or accept the default value.
If you want your domain name to go directly to the application, make sure the In Directory text box is blank.
5) Click the Advanced Options icon icon to expand Advanced Options.
If you do not want to receive e-mail notifications when application updates are available, select the Disable Update Notifications check box.
It is recommended that you receive e-mail notifications when application updates are available. Keeping your site updated helps prevent unauthorized access attempts and data loss.
6) To receive site configuration information after the installation is complete, type an e-mail address in the Email installation details to text box.
7) Review the installation options and settings, and then click Install. When installation is complete, Softaculous provides information about the application's configuration.
Saturday, June 2, 2018
Install Composer
.
Introduction#
Composer is a tool for dependency management in PHP. It allows you to declare the libraries your project depends on and it will manage (install/update) them for you.
Dependency management#
Composer is not a package manager in the same sense as Yum or Apt are. Yes, it deals with "packages" or libraries, but it manages them on a per-project basis, installing them in a directory (e.g.
vendor) inside your project. By default it does not install anything globally. Thus, it is a dependency manager. It does however support a "global" project for convenience via the global command.
Suppose:
- You have a project that depends on a number of libraries.
- Some of those libraries depend on other libraries.
Composer:
- Enables you to declare the libraries you depend on.
- Finds out which versions of which packages can and need to be installed, and installs them (meaning it downloads them into your project).
See the Basic usage chapter for more details on declaring dependencies.
System Requirements#
Composer requires PHP 5.3.2+ to run. A few sensitive php settings and compile flags are also required, but when using the installer you will be warned about any incompatibilities.
To install packages from sources instead of simple zip archives, you will need git, svn, fossil or hg depending on how the package is version-controlled.
Composer is multi-platform and we strive to make it run equally well on Windows, Linux and macOS.
Installation - Linux / Unix / macOS#
Downloading the Composer Executable#
Composer offers a convenient installer that you can execute directly from the commandline. Feel free to download this file or review it on GitHub if you wish to know more about the inner workings of the installer. The source is plain PHP.
There are in short, two ways to install Composer. Locally as part of your project, or globally as a system wide executable.
Locally#
To install Composer locally, run the installer in your project directory. See the Download page for instructions.
The installer will check a few PHP settings and then download
composer.phar to your working directory. This file is the Composer binary. It is a PHAR (PHP archive), which is an archive format for PHP which can be run on the command line, amongst other things.
Now run
php composer.phar in order to run Composer.
You can install Composer to a specific directory by using the
--install-dir option and additionally (re)name it as well using the --filename option. When running the installer when following the Download page instructions add the following parameters:php composer-setup.php --install-dir=bin --filename=composer
Now run
php bin/composer in order to run Composer.Globally#
You can place the Composer PHAR anywhere you wish. If you put it in a directory that is part of your
PATH, you can access it globally. On unixy systems you can even make it executable and invoke it without directly using the php interpreter.
After running the installer following the Download page instructions you can run this to move composer.phar to a directory that is in your path:
mv composer.phar /usr/local/bin/composer
If you like to install it only for your user and avoid requiring root permissions, you can use
~/.local/bin instead which is available by default on some Linux distributions.Note: If the above fails due to permissions, you may need to run it again with sudo.
Note: On some versions of macOS the/usrdirectory does not exist by default. If you receive the error "/usr/local/bin/composer: No such file or directory" then you must create the directory manually before proceeding:mkdir -p /usr/local/bin.
Note: For information on changing your PATH, please read the Wikipedia article and/or use Google.
Now run
composer in order to run Composer instead of php composer.phar.Installation - Windows#
Using the Installer#
This is the easiest way to get Composer set up on your machine.
Download and run Composer-Setup.exe. It will install the latest Composer version and set up your PATH so that you can call
composerfrom any directory in your command line.Note: Close your current terminal. Test usage with a new terminal: This is important since the PATH only gets loaded when the terminal starts.
Manual Installation#
Change to a directory on your
PATH and run the installer following the Download page instructions to download composer.phar.
(if you get error message unable to find wrapper https probably you did not enable php opensll module or your php wasn't installed properly)
Create a new
composer.bat file alongside composer.phar:C:\bin>echo @php "%~dp0composer.phar" %*>composer.bat
Add the directory to your PATH environment variable if it isn't already.
e.g. c:\composer

Close your current terminal. Test usage with a new terminal:
C:\Users\username>composer -V
Composer version 1.0.0 2016-01-10 20:34:53
Using Composer#
SOURCE: https://getcomposer.org/doc/00-intro.md
.
Sunday, May 13, 2018
Verify Firebase ID Token Using Fuel PHP

This is a simplistic approach to use a PHP Framework (Fuel PHP) instead of Plain PHP.
Frameworks often have better mechanisms to handle web requests. For example, you can easily create a RESTful server and test it using REST Client such as Postman (refer the above screenshot). Install Postman REST Client for Chrome here.
1) Create Fuel PHP Project and Add PHP-JWT Library to the project
If your hosting provider includes softaculous in their services, read this page to quickly create Fuel PHP Project on your web site, https://php-steps.blogspot.com/2018/10/install-fuelphp-via-softaculous.html .
2) Write the PHP script
filename: ./fuel/app/classes/controller/verifytoken.php
If you do not want to use PHP Framework, read this page to create Plain PHP script codes, https://php-steps.blogspot.com/2018/05/verify-firebase-id-token-using-plain.html .
Saturday, May 12, 2018
Verify Firebase ID Token Using Plain PHP Script Codes
1) Add PHP-JWT Library to your PHP project.
Use composer, or add the library manually.To use composer, follow the guide here, https://firebase-php.readthedocs.io/en/latest/overview.html.
To add the library manually, download the php-jwt library from https://php-download.com/ .
For example, if you want to download version 4, (https://php-download.com/downloads/download?vendor=firebase&package=php-jwt&version=4.0.0.0&downloadType=REQUIRE)
Alternatively, you can download php-jwt library from here, (https://drive.google.com/open?id=1IHUWJQTKEy1hjKLyIICJj0ITBXaDNTkI ).
Unzip the package, find the folder php-jwt and copy the folder to your project.

the php-jwt is added to the project folder phpjwtdecode
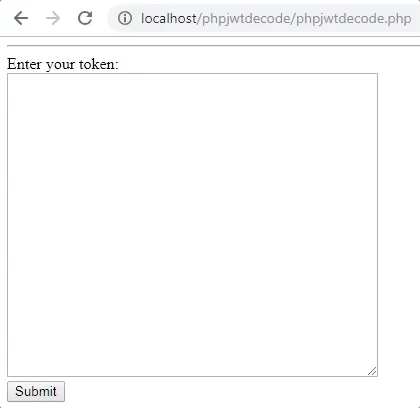
2) Write the PHP script
filename: phpjwtdecode.php
3) Execute
FURTHER READING:
https://firebase-php.readthedocs.io/en/stable/authentication.html
Friday, May 11, 2018
How To Decode Firebase JSON Web Token (JWT) Online

Firebase ID tokens on clients
When a user or device successfully signs in, Firebase creates a corresponding ID token that uniquely identifies them and grants them access to several resources, such as Firebase Realtime Database and Cloud Storage. You can re-use that ID token to identify the user or device on your custom backend server. To retrieve the ID token from the client, make sure the user is signed in and then get the ID token from the signed-in user.(Reference: https://firebase.google.com/docs/auth/admin/verify-id-tokens )
Firebase ID token example
The above screenshot shows an example of Firebase Id Token (JWT) decoded by jwt.ioHow to verify using jwt.io?
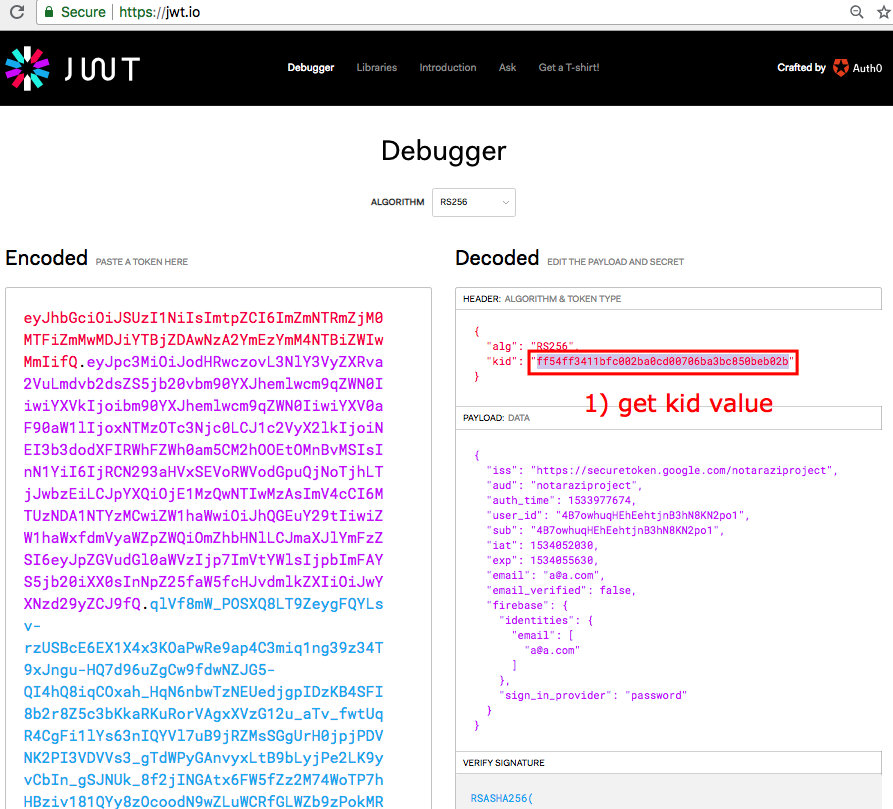
1) Paste Firebase Id Token and get the kid value

2) Go to GoogleApis website and find the matching certificate value

3) Copy and paste the certificate value (in plain text without "\n") to jwt.io website
FURTHER READING:
https://www.sitepoint.com/php-authorization-jwt-json-web-tokens/
https://www.quora.com/How-can-I-validate-the-JWT-token-in-PHP
Subscribe to:
Posts (Atom)